A Static Blog with Jekyll and S3 - Part 1
21 Apr 2014 filed under: computingIn the wake of Textdrive.com’s implosion, I’ve been working on and off on migrating my blog to a site hosted as static pages on Amazon’s S3. It’s fortunate that I had been thinking about doing this very recently, and already had draft (well, very draft) quality migrations of many of the pages to Jekyll’s Liquid markup. In all honestly, the supplied automatic Wordpress to Jekyll migration did not work well for me. I succeeded in getting some textual representation of my blog posts and pages out of the database, without resorting to my own hacking skills, but it’s all quite a bit of a mess and few pages, if any, would work “out of the box.”
Putting aside the translation bit, getting Jekyll up and running has been quite straightforward and I thought I’d document a bit of it here for people. I should note that I’m primarily running things on a Mac, and I use Git for revision control, but this should work equally well on a PC even without revision control. There are a lot of articles on doing this, so I’m going to try to make this one short and sweet (too late?)
The architecture is static HTML+CSS hosted by Amazon’s S3. The “bloginess” of the site (e.g. pages, posts, categories, tags, and visual theme via CSS) is all managed by Jekyll, with content written in Jekyll’s markup language (Markdown+Liquid). The site source, including posts and pages, is stored in a Git repository, and the HTML+CSS website that Jekyll creates is transferred to Amazon’s S3 after each update to the site’s content.
Get started with Jekyll
Jekyll’s written in Ruby. I’ll have to figure out how I installed it, but I think that I just used Ruby’s Gem package manager. I also seem to be running a version of Ruby installed by Homebrew, which I use to manage packages on my Mac.
Follow the Jekyll Quick Start to make a test site. Jekyll should create a directory called _site that contains your compiled website. Jekyll rebuilds these pages each time you execute the command jekyll build. You should test out your site locally by running jekyll serve and opening http://localhost:4000 in your web browser of choice. Note that jekyll serve automatically calls the build step, so you don’t need to do that separately.
If everything works well, then you’re ready to move on.
Creating a home on S3
Amazon’s S3 is nominally for file storage, but they have a feature whereby a collection of files, called a bucket, can be made available via an Amazon-run HTTP server.
WARNING: Amazon’s S3 is hosted storage run by Amazon. You pay them in real dollars for what you use, and as your website will be freely available on the Internet, you’ll at least pay data-transfer fees for whatever you serve up to anyone else. So if a bot-net in China decides to crawl your site 30,000 times an hour, you presumably will see a higher bill. The advice that I give here is what I’ve found to work well for me, but whatever bill you end up with at the end of the month is your problem. You have been warned.
With that said, I’ve found S3 to be dirt cheap for personal use. I recently backed up my 40Gb photo collection to Amazon Glacier at a transfer cost of about a dollar, and the storage is costing me $0.40/month. The other 40GB or so that I keep on S3 costs me about another $3-4/month. I’m happy, but your mileage may vary.
Create an S3 bucket
Amazon has a nice walkthrough on setting up a bucket (think “volume”) on S3 for hosting a static website. That’s a good start. The key issues are:
- When someone accesses your site, they can use a variety of names, but ultimately only one fully-qualified domain name will show up in the reader’s web browser. For instance, you can get to my blog with
www.neilweisenfeld.com, but the address will be rewritten as simplyneilweisenfeld.com. Decide whether you’d like your site to show up as eithermyawesomedomain.comorwww.myawesomedomain.comand create the bucket with that name. The site can be reached through a multitude of names. This is simply a choice about how the address will be seen in the browser’s URL bar. - Configure the bucket for the
index.htmland 404 error pages. These should be the corresponding pages in your bucket generated by Jekyll. - Configure a bucket permission policy to allow anyone read-only access to the files in this bucket. This is ugly in S3 and currently requires you to paste in a bit of JSON code: see the walk-through.
- If you’ve decided to use
myawesomedomain.com, you should create a bucket named with thewww.form, and configure this bucket to simply redirect requests to yourmyawesomedomain.combucket. You might be able to do this trickery with DNS, rather than an empty bucket that redirects, but I haven’t thought through the implications. My guess is that if you do it through DNS, the URL will not be rewritten in the end user’s browser bar.
At this point, if you have an index.html file in your bucket, you should be able to serve it to a web browser using a combination of the bucket name and the Amazon server name. For instance, my site is reachable via http://neilweisenfeld.com.s3-website-us-east-1.amazonaws.com/. You should get this URL from the “properties” tab for your bucket.
Uploading data to your S3 bucket
The first time through, I used Panic Software’s awesome Transmit program to upload data to my S3 bucket. This is a great way to go, but Transmit doesn’t correctly set the MIME-type associated with CSS files, so they probably won’t load as CSS. You can fix this from Transmit’s settings panel by defining a custom header, content-type, with value text/css that will be used for files ending in .css. See the image below.

Pointing a “name” at your new site
If you’ve made it this far, then your site should be accessible using the *.amazonaws.com endpoint mentioned above. This is not a terribly convenient name, however. If you’ve registered your own domain name, then your domain registrar probably provides you with free DNS services. You need to log in to your domain account, and create a CNAME record (essentially a name alias) that points from your ‘www’ name, to the long-winded Amazon endpoint for your ‘www’ bucket. And the same for your ‘non-www’ name pointing to your ‘non-www’ bucket endpoint.
An example of my configuration, on Hover.com (my domain name registrar’s website), is shown below:
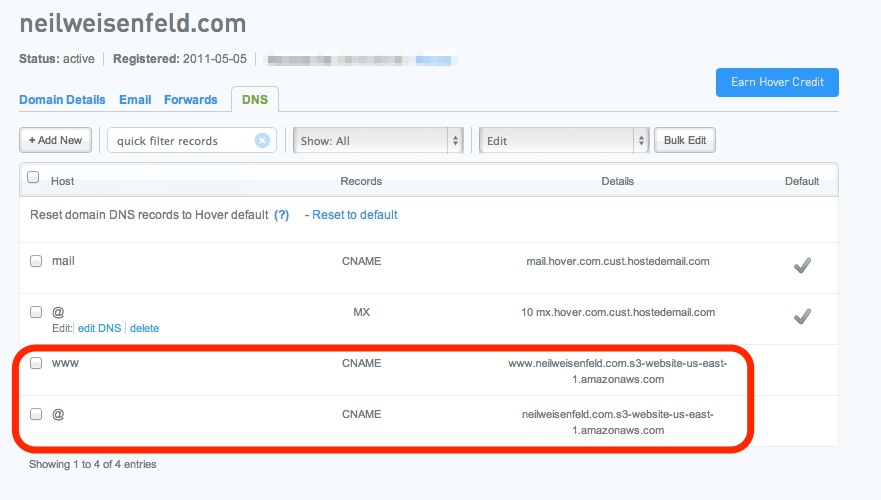
There’s a CNAME for ‘www’ defined relative to my domain, and for the special token ‘@’ which matches just the domain name, with no leading subdomain or hostname (e.g. ‘www’).
Note that any changes you make in DNS configuration could take minutes to hours to propagate, especially if you make changes to a DNS record, rather than adding a new one.
If you don’t have a DNS provider, you can always look at Amazon’s Route 53 product.
Conclusion
So now you should have a basic Jekyll set-up, hosted on S3, and with your own custom domain name pointing at it. In part 2, I’m going to write about Google Analytics, syncing blog content from my local computer to S3 with free command-line tools, and anything else that I can think of.